If you are opening this guide in the middle of funeral planning, family texts, and a stack of paperwork, the claim process can feel bigger than it is. Grief makes even ordinary forms feel heavy.
The good news is that filing a life insurance claim is usually straightforward once you break it into small tasks and handle them in order. It works a bit like following a checklist after a move. You do not need to solve everything at once. You just need the right document, the right form, and a clear next step.
Claims are often paid without major problems, which matters to remember when your mind is already jumping to worst case scenarios. The process can still feel stressful, especially if the policy was bought online and most of the records live in email inboxes, carrier apps, or a shared cloud folder instead of a filing cabinet.
This guide explains the process for filing a life insurance claim in plain language. You will learn what to gather, how to keep digital records organized, when to use an online portal versus paper forms, what the insurer is reviewing, and what to do if the claim slows down. The goal is not just to finish the paperwork, but to help you get through it with less confusion and less avoidable stress.
Table of Contents
- Your Compass for Navigating the Claim Process
- First Steps Finding the Policy and Getting Certified Copies
- Gathering the Essential Documents for Your Claim
- Completing and Submitting the Claim Form Online and Offline
- What Happens Next Timelines Payouts and Insurer Review
- How to Handle Common Claim Delays or Denials
Your Compass for Navigating the Claim Process

Most beneficiaries start with the same question. “What am I supposed to do first?” The answer is simpler than it looks. You identify the insurer, gather a few key documents, complete the claim form, and submit it in the insurer's preferred format.
That sequence matters because it keeps you from doing extra work. People often get stuck searching for every possible paper before they even contact the company. Usually, you only need to focus on the essentials first, then respond to any follow-up request if the insurer asks for more.
Practical rule: Don't try to solve the whole claim in one sitting. Handle the next document, the next form field, or the next phone call.
If you're a spouse, partner, adult child, or named beneficiary, the process usually feels easier once you can see it as a checklist instead of a legal mystery. Insurance companies do this every day. Their claim departments are built to verify identity, confirm the policy, and release the death benefit once the file is complete.
Two things also help emotionally. First, keep one folder, physical or digital, for everything related to the claim. Second, ask one trusted person to sit with you while you make the first call or upload the first document. Grief can make simple tasks feel harder than they are.
First Steps Finding the Policy and Getting Certified Copies
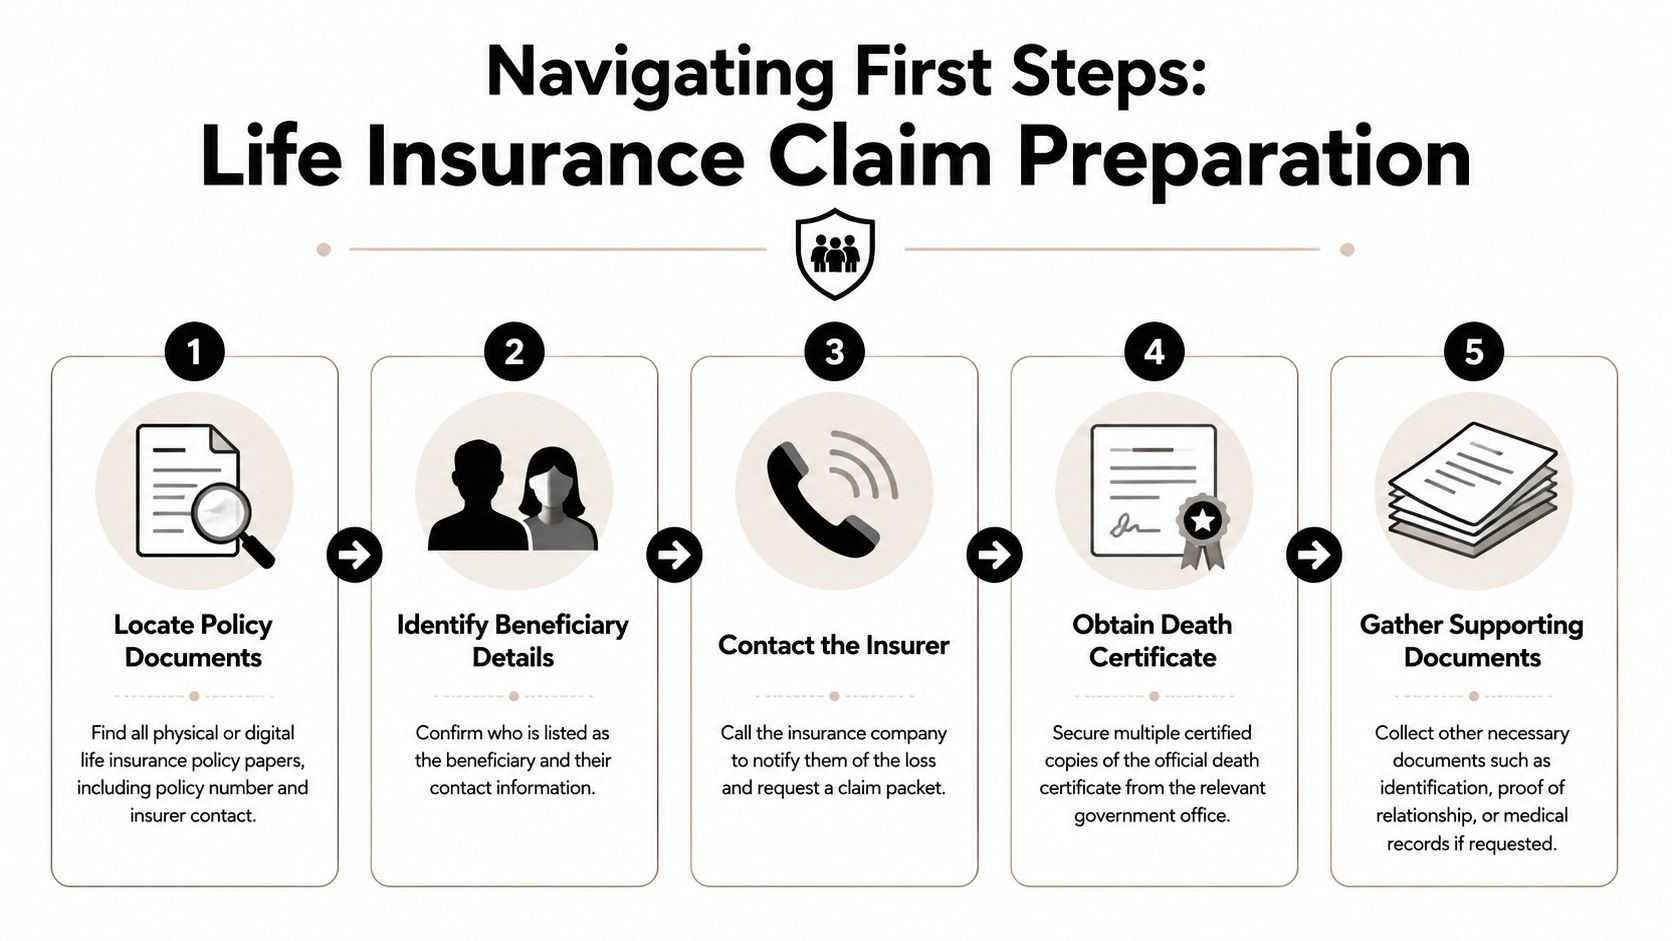
On day one, the goal is not to solve the whole claim. It is to remove the first two bottlenecks. You need to identify the insurer and order certified copies of the death certificate.
That may sound simple, but grief makes simple tasks feel heavier. A short, focused plan helps. For many younger families, that plan starts on a phone or laptop rather than in a file cabinet.
Where to look for the policy
Start with the fastest places to confirm coverage. If the policy was bought online, the record may be easier to find in an inbox than in a binder.
Check these places first:
- Email and cloud storage: Search the deceased person's email for the insurer's name, “policy,” “term life,” “premium,” “beneficiary,” or “coverage.”
- Insurance apps and online accounts: Look for saved logins in a password manager, a phone browser, or a financial dashboard.
- Home files: Review desk drawers, safes, filing cabinets, or folders labeled insurance, estate, benefits, or financial planning.
- Work benefits: If the deceased had employer coverage, ask HR or the benefits administrator whether group life insurance was in place.
- Professional contacts: An insurance agent, financial advisor, accountant, or attorney may know which company issued the policy.
If you find a policy but the pages feel hard to read, this guide on how to read a life insurance policy can help you locate the insurer name, policy number, and beneficiary details.
Even if you cannot find a policy, you can still proceed. Use the NAIC Life Insurance Policy Locator Service, then check employment records, bank statements for premium payments, and old tax or estate files. NerdWallet's life insurance claim guide notes that locator tools can help families identify missing coverage.
One practical tip helps here. Write down every company name you find, even if you are not sure it is the right one. A partial lead is still useful.
Why certified death certificates matter
Insurers usually ask for a certified death certificate to open and review a claim. In plain terms, that means an official copy issued by the proper authority, not a home printout or regular photocopy.
Families often need several certified copies because life insurance is rarely the only account that needs one. Banks, retirement plan administrators, and courts may ask for the same document. Ordering multiple copies at the start can save time and repeated requests later.
You can usually request them through:
- The funeral home, which often helps place the order
- The local or state vital records office
- The county health department, depending on where the death occurred
Before you order, ask two questions. How long will delivery take, and how can you request more copies later if another institution asks for one?
A calmer way to handle the first day
If you are helping from your phone, create one note titled “Life insurance claim” and keep everything there. Add the insurer name, any policy number, the claim department phone number, and the date you requested death certificates. Small steps like this reduce the mental load because you do not have to remember everything at once.
A simple first-day checklist:
- Confirm the insurer name
- Find the policy number if possible
- Write the beneficiary's legal name exactly as shown on ID
- Request certified death certificates
- Ask the insurer how claims are submitted, online portal, email, mail, or fax
That is enough for day one. Progress counts, even when it feels slow.
Gathering the Essential Documents for Your Claim
Once you know where the claim is going, build a clean claim packet. Think of it as making it easy for the insurer to verify who died, who is claiming the benefit, and whether any extra paperwork applies to your situation.
The core documents most claims need
Most beneficiaries will need four things right away.
The first is the claim form, sometimes called a claimant's statement or request for benefits. This is the insurer's official form where you identify yourself, identify the insured person, and request payment.
The second is the certified death certificate you gathered earlier. This confirms the death and gives the insurer the legal record it needs to proceed.
The third is policy information. If you have the policy number, include it. If you have the full policy document, keep it nearby, though some insurers can still process the claim without the original contract.
The fourth is your identification. A government-issued ID helps the insurer confirm that the named beneficiary is the person filing.
Documents that may apply only in certain cases
Some claims need extra support. That doesn't mean there's a problem. It usually means the insurer needs to match the payout to the legal recipient.
You might also need:
- Trust documents if a trust is the beneficiary
- Guardianship or custodial paperwork if the beneficiary is a minor
- Marriage certificate or name-change record if your current legal name differs from the name on the policy
- Police or autopsy reports if the insurer asks for more detail after an accidental or unusual death
- Employer benefits information for group life insurance claims
Keep originals separate from your working copies. Even when you submit online, save a digital folder with scans named clearly, such as “death-certificate-certified-copy” or “beneficiary-ID-front.”
Required Document Checklist
| Document | Where to Get It | Pro Tip |
|---|---|---|
| Claim form | Insurance company claims department or online portal | Download the latest version directly from the insurer if you're filing yourself |
| Certified death certificate | Funeral home or vital records office | Order multiple copies so other financial tasks don't stall |
| Policy number or policy copy | Personal files, email, advisor, employer records | If you only have partial details, submit what you know and ask the insurer to help verify |
| Beneficiary government-issued ID | Your wallet, DMV-issued ID, passport, or other government ID | Make sure the name matches the claim form exactly |
| Beneficiary contact information | Your own records | Use an email and phone number you'll monitor closely |
| Trust paperwork, if needed | Estate attorney or trustee records | Send the signature pages and any pages identifying the beneficiary authority |
| Guardianship or custodial paperwork, if needed | Court records or estate records | Ask the insurer whether certified copies are required |
| Police or autopsy reports, if requested | Medical examiner, coroner, or law enforcement agency | Don't order these unless the insurer says they're needed |
How to organize it without getting overwhelmed
A simple system works best. Create one folder labeled with the insured person's name and the word “claim.” Inside it, use three groups:
- Ready to submit
- Waiting for documents
- Sent to insurer
That last folder matters. Save screenshots of uploads, confirmation emails, mailing receipts, and the date you spoke with a claims representative. If someone asks later when you submitted the file, you won't have to guess.
Completing and Submitting the Claim Form Online and Offline
Filling out the claim form is the point where many people worry they'll make a mistake. Usually, the form is more straightforward than it looks. It asks for identifying details, a few facts about the death, and instructions on how the beneficiary wants to receive the money.

What the claim form is really asking for
The form usually includes sections for the insured person's name, date of birth, Social Security number, policy number if known, date of death, and cause of death. It also asks for the beneficiary's legal name, address, contact details, and tax-related identifying information if required by the insurer.
A few fields deserve extra attention:
- Legal names: Use full legal names, not nicknames.
- Dates: Match the death certificate exactly.
- Cause of death: Copy the wording from the death certificate when appropriate instead of paraphrasing.
- Payout instructions: Read this carefully before selecting how you want to receive the benefit.
If the form asks for information you don't have, don't guess. Contact the insurer and ask what to put in that field or whether it can be left blank pending review.
Choosing online or paper submission
Many beneficiaries still imagine this process as a stack of forms sent by mail. That still exists, but digital claims are increasingly common, especially with newer no-exam term policies.
LIMRA's Q1 2026 data shows 60% of millennials prefer online claims, and digital claims can use AI-driven verification to reduce processing times to under 14 days and cut paperwork errors significantly, according to MetLife's life claims information.
That matters for young families who may not have a printer, fax machine, or patience for mailing certified packets back and forth.
Here's the practical difference:
| Submission method | What it looks like | Best for |
|---|---|---|
| Online portal | Upload forms and document images, receive confirmation quickly | Beneficiaries who want speed and status visibility |
| Email, if accepted by insurer | Send scanned forms to a designated claims address | Situations where the insurer allows secure document intake |
| Print forms, attach documents, send physical packet | Beneficiaries who prefer paper or insurers that still require it |
A short explainer may help if you want to see how claim basics work before you submit:
Small accuracy checks that prevent headaches
Before you hit submit or seal an envelope, pause for a five-minute review.
- Match names exactly: Beneficiary and insured names should line up with the policy and ID records.
- Check attachments: Make sure every required file is attached and legible.
- Save proof: Download the submission confirmation or keep the mailing receipt.
- Write down the claim number: If the insurer assigns one, keep it at the top of your notes.
A careful final review is often the difference between a smooth claim and a claim that sits in follow-up because one attachment was missing.
If you're filing online, take screenshots after each major step. If you're mailing documents, consider using a tracked delivery method so you can confirm arrival.
What Happens Next Timelines Payouts and Insurer Review
You submit the claim, get a confirmation, and then everything goes quiet. That silence can feel unsettling, especially if you are juggling grief, bills, and family logistics at the same time. For digital-first policies, the process often keeps moving in the background through portal updates, email requests, and internal insurer review, even when you do not hear from a person right away.

What the insurer reviews
At this stage, the insurer is checking whether the pieces fit together. The review usually focuses on three things. Was the policy active when the insured died? Is the person filing the claim the beneficiary listed on the policy, or someone legally allowed to act for them? Are the documents complete and consistent?
A simple claim can move fairly quickly. A claim can take longer if the insurer needs to verify identity, clarify a name difference, confirm beneficiary details, or review circumstances around the death under the policy terms.
If your policy was purchased online, some of this review may happen through automated checks first, then a claims examiner steps in if something does not match. That can feel impersonal, but it often just means the system flagged a detail for a human to confirm.
How long review and payment can take
There is no single timeline for every claim, but many straightforward claims are resolved within a few weeks after the insurer receives a complete file. The phrase "complete file" matters. If one document is missing or unreadable, the clock often slows because the insurer has to stop and ask for more information.
One helpful way to think about the timeline is like airport security. If your documents are ready and match what is expected, you move through with fewer stops. If the name on one record is different, or an item is missing, your file may get pulled aside for extra review.
Digital policies can speed up part of this process because uploads, confirmations, and identity checks happen faster than paper mail. They can also create a new kind of stress. Families may miss an email asking for one more document, or assume a portal status means payment is already on the way. Check the status page, but also watch your inbox, spam folder, voicemail, and physical mail.
How payout choices usually work
Once the claim is approved, the insurer will arrange payment of the death benefit. If you want a quick refresher on what that payment is designed to provide, see what a death benefit in life insurance covers.
Many beneficiaries choose between a lump sum and installments.
A lump sum sends the full amount at once. That gives you the most control, which can help if you need to cover funeral costs, mortgage payments, childcare, or a period of lost income.
Installments spread the money over time. Some families prefer that structure because it reduces the pressure of making big money decisions in the first few weeks after a loss. The tradeoff is less flexibility.
If you are unsure, pause before choosing. It is reasonable to ask the insurer to explain each option in plain language and confirm whether you can change your payout election before payment is issued.
A good payout choice is the one that fits your immediate reality, not the one that sounds best on paper.
What you can do while you wait
Waiting is easier when you give yourself a short, repeatable routine.
- Check for claim updates once a day, not every hour.
- Respond promptly to any request from the insurer.
- Keep all claim emails, portal screenshots, and call notes in one folder.
- Write down the date, the representative's name, and what was said after each call.
- Hold off on major spending plans until the money is in your account.
If several family members are involved, choose one point person to communicate with the insurer. That simple step cuts down on crossed wires and repeated calls, which matters even more with app-based or online-only policies where updates may be scattered across different channels.
How to Handle Common Claim Delays or Denials
You submit the forms, upload the documents, and expect the last hard part to be over. Then the insurer emails asking for one more item, or a letter arrives saying the claim was denied. That can feel like the floor dropped out again.
Slowdowns and denials are different problems, and they call for different responses. A delay usually means the insurer is still trying to verify something. A denial means the insurer believes the policy does not require payment based on the facts it has.
Why a claim gets delayed
A delay often starts with a small mismatch, the claims version of a missing puzzle piece. The insurer may have almost everything needed, but one gap keeps the file from moving to approval.
Common reasons include:
- Missing documents: a death certificate, beneficiary ID, or signed claim form is absent
- Names that do not match: the policy lists one name, while current identification shows another because of marriage, divorce, or a legal name change
- Conflicting details: dates, addresses, or personal information do not line up across forms
- A review period: the insurer needs more time to confirm the application information, cause of death, or policy status
Ask for any follow-up request in writing. For digital-first policies, save the email, download the portal message, and take a screenshot after each upload. Online systems are convenient, but they can scatter the record across inboxes, apps, and text alerts. Pulling everything into one folder gives you one place to check when stress makes details harder to hold in your head.
What to do if the claim is denied
Start with the denial letter, not the phone summary. The letter is the roadmap. It should tell you why the insurer refused the claim and what steps are available if you disagree.
Read it slowly. Then work through this order:
Identify the exact reason for the denial
Look for the specific policy term, exclusion, or factual issue the insurer is relying on.Request a fuller explanation if the letter is vague
Ask which document, statement, or section of the policy led to the decision.Compare that reason with the policy itself
Pay close attention to exclusions, contestability questions, and beneficiary information. If you need a plain-English refresher, this guide on what life insurance does not cover can help you understand the kinds of exclusions insurers may point to.Correct factual errors with documents
If the insurer has the wrong date, wrong identity record, or incomplete paperwork, answer with records that directly fix that problem.File an appeal in writing if the policy allows it
Keep the appeal focused. Match each denial reason with the document or explanation that addresses it.Contact your state department of insurance if the process seems mishandled
They can explain complaint options and what consumer protections apply in your state.
Many denials trace back to policy exclusions or to information the insurer believes was inaccurate on the application. That does not mean the first answer is always the final one. It means you need to respond to the stated reason with records, not guesswork.
A calm paper trail is often stronger than an emotional argument.
How to stay organized while the issue is being sorted out
Treat the claim like a shared family project with one binder, even if that binder is a digital folder. Put the denial letter, policy, death certificate, claim form, upload confirmations, and call notes in the same place. After each phone call, write down the date, the representative's name, and the next action promised.
If several relatives are involved, choose one point person. That matters even more with online-first insurers, where one update may arrive by email, another inside the account portal, and another by text. One person tracking it all reduces repeated calls and mixed messages.
Persistence helps most when it is specific. Instead of saying, “What is going on with the claim?” ask, “What exact document or policy provision is holding this file open?” That question is easier for a representative to answer, and it gives you a clearer next step.
If you are helping a spouse, sibling, or parent, you do not need to solve everything in one sitting. Handle one request at a time. Get the document. Confirm receipt. Save the proof. Then move to the next item.